Encore Forums Encore Forums

Knowledgebase  Register  Login  My Profile  Inbox  Address Book  My Subscription  My Forums 

Photo Gallery  Member List  Search  Calendars  FAQ  Ticket List  Log Out

custom paper wizard

 
Logged in as: Guest
  Printable Version
All Forums >> [Product Forums] >> [Productivity Software] >> [The Print Shop 23.1 and older] >> PS General functionality >> custom paper wizard Page: [1]
Login
Message << Older Topic   Newer Topic >>
custom paper wizard - 1/26/2008 1:20:19 PM   
hayley


Posts: 6
Joined: 1/26/2008
Status: offline
I am trying to create paper. I am using the label option so that I can get 4 on one sheet.
I set up 8.5 x 14 legal size paper (I did this is print setup also)
I chose 2 columns horizontal and vertical
I chose label width 4 and label height 6
For some reason everytime I do this the rulers indicate that the label is less than the correct size (4x6). I don't understand.
I am trying to fit 12 photos within a 4 x 6 space so sizing is very important. Any help would be appreciated.
Post #: 1
RE: custom paper wizard - 1/26/2008 1:37:17 PM   
Brandy redux


Posts: 2376
Joined: 2/7/2007
Status: offline
Hi hayley,

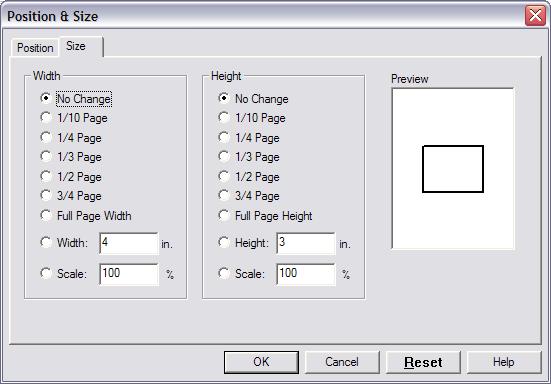
When you view the label on the workspace, do you see a dotted line margin inside the solid line border of the label? If you do, that means that you did not select the Full Bleed option when you created the Custom Paper. And, that also means that your labels have built-in, unprintable margin areas around all 4 sides of each label. And, the ruler you see on the workspace displays ONLY the printable area on the label. So, the ruler will be slightly smaller than 4 x 6. If you want to print to the very edge of the label, you must go back to the Custom Paper you created and select the Full Bleed option. And, after you do that, you might have to close and then re-open the label project for the Full Bleed option to be properly activated. But, when the Full Bleed option is properly activated, the dotted line margins will be OUTSIDE the solid line border of the label. And, the ruler will be set to slightly larger than 4 x 6. HOWEVER, when you design your label you'll want to be sure that the pictures on the label do NOT extend outside the solid line border of the label - because if they do, and if you did not design your labels with spaces between them, pictures from one label could print overlapped over other labels that touch that label.

_____________________________

For More Help:
Click on the FAQ link at the top of this page
Then, click on the All FAQ's button on the next page

To contact me by email, please send your message to pine_97@yahoo.com

(in reply to hayley)
Post #: 2
RE: custom paper wizard - 1/26/2008 4:56:07 PM   
lindarobin


Posts: 947
Joined: 8/28/2004
Status: offline
quote:

ORIGINAL: hayley
... I am trying to fit 12 photos within a 4 x 6 space so sizing is very important.

You're on the right track. Brandy's point about the full bleed option is the crux of the matter. I take it you are printing onto regular legal size stock, not a pre-perforatted Avery stock, so label misalignment shouldn't be a problem.

If you create your stock as shown in this screenshot, your four 4x6's will print in the center of the sheet.

Your resulting print will give you 4 identical images, each image being a collage of 12 photos. Is that what you wanted? I'd think it kind of hard to squeeze 12 photos into a 4x6 space, unless you are making something like a photo index card.


Attachment (1)

(in reply to hayley)
Post #: 3
RE: custom paper wizard - 1/26/2008 7:24:02 PM   
hayley


Posts: 6
Joined: 1/26/2008
Status: offline
Ok this is great information. I did it! I am trying to fit a large number of photos onto one small area but I think it can be done BUT can it be done without distorting the photos too much? I am working on that now. I have another question in regards to resizing that I will post with another topic. Is that the correct way to do this forum business?

Thanks so much!

(in reply to lindarobin)
Post #: 4
RE: custom paper wizard - 1/26/2008 8:40:22 PM   
lindarobin


Posts: 947
Joined: 8/28/2004
Status: offline
quote:

ORIGINAL: hayley
... I am trying to fit a large number of photos onto one small area ...can it be done without distorting the photos too much?

In my experience, image degradation can be minimized when doing the resizing mathematically, rather than dragging in the corners.

So with your photo selected, click Arrange| Size| More... and then input your new width and keep the same scale for the height to maintain aspect ratio.

It would be a good test to put two copies of a photo in your project. Resize one with the Size and Position box. Resize the other with dragging the corner. Print. If you see no difference, then either resizing method is fine in Print Shop. I do know it makes a huge difference in other programs.


Attachment (1)

(in reply to hayley)
Post #: 5
RE: custom paper wizard - 1/26/2008 8:41:47 PM   
Brandy redux


Posts: 2376
Joined: 2/7/2007
Status: offline
quote:

I have another question in regards to resizing that I will post with another topic. Is that the correct way to do this forum business?


It is perfectly OK to post in another topic when you have a question about a different subject. But, it's also OK for you to post in the same topic even when you have a question about a different subject. Just as long as you DON'T post questions about the same subject in more than one topic, that's cool with us.

_____________________________

For More Help:
Click on the FAQ link at the top of this page
Then, click on the All FAQ's button on the next page

To contact me by email, please send your message to pine_97@yahoo.com

(in reply to hayley)
Post #: 6
RE: custom paper wizard - 1/26/2008 8:56:25 PM   
hayley


Posts: 6
Joined: 1/26/2008
Status: offline
Thanks! I will likely have more questions.

regarding degradation...would it be wise to play with the sizing, get them exactly like I like them, figure out what size they are when I have them the way I want them, then open a new project and size them accordingly? I read somewhere that the more you resize them the more they are degraded.

< Message edited by hayley -- 1/26/2008 8:59:09 PM >

(in reply to Brandy redux)
Post #: 7
RE: custom paper wizard - 1/26/2008 9:20:11 PM   
lindarobin


Posts: 947
Joined: 8/28/2004
Status: offline
quote:

ORIGINAL: hayley
... I read somewhere that the more you resize them the more they are degraded.

That is true in some programs. When making the image smaller actually discards pixels, this loss will be reflected in the quality of the image if you try to enlarge it. You won't have this problem while working in Print Shop because the pixel info is not discarded as you manipulate your photos. Even cropping a photo in the program only displays the cropped photo. You can "uncrop" at any time and get it all back.

If you make an image smaller and then export that image as JPG, then import that JPG back into Print Shop and try to enlarge it, you will see a loss in quality.

(in reply to hayley)
Post #: 8
RE: custom paper wizard - 1/26/2008 9:22:30 PM   
hayley


Posts: 6
Joined: 1/26/2008
Status: offline
got it! thanks again.

(in reply to lindarobin)
Post #: 9
Page:   [1]
All Forums >> [Product Forums] >> [Productivity Software] >> [The Print Shop 23.1 and older] >> PS General functionality >> custom paper wizard Page: [1]
Jump to:


New Messages No New Messages
Hot Topic w/ New Messages Hot Topic w/o New Messages
Locked w/ New Messages Locked w/o New Messages
 Post New Thread
 Reply to Message
 Post New Poll
 Submit Vote
 Delete My Own Post
 Delete My Own Thread
 Rate Posts


Please Note: In order to post a message on the forums, you will need to become an Encore Forum Member. Click on the Register link on the top of this page and follow the instructions to become an Encore Forum Member.

If you are a new member and need help using these forums, please click on the FAQ link at the top of this page.

Forum Software © ASPPlayground.NET Advanced Edition 2.4

0.047