Brandy redux
Posts: 2376
Joined: 2/7/2007
Status: offline

|
Problem
I selected the 'Typical' install option when I installed the program from the "Install" CD. How do I install the Art CD?
Solution
Complete 'Custom' Install after 'Typical' Was Chosen
The 'Typical' install option does not install the projects and images from the Art CD. So, Calendar Creator requires the Art CD to be inserted after selecting Art images which are installed only on the Art CD. The following procedure describes how to install this content to the hard drive so that the Art CD is no longer necessary when selecting art.
Complete these steps:
1. Close all programs and windows to return to the desktop.
2. Insert the Install disc into the proper drive.
3. For WinXP, click on 'Start' then double-click 'My Computer' (or hover the mouse pointer over 'My Computer' until the list of drives drops down).
4. For Windows Vista or Windows 7, click on 'Start' then double-click 'Computer' (or hover the mouse over 'Computer' until the list of drives drops down)
4. Right-click the drive containing the Calendar Creator® Install disc, then select 'Open' from the menu that appears.
5. Double-click the 'Setup' folder.
6. Double-click the 'SETUP.EXE' or 'Setup' file to begin the installation.
7. Click 'Next' in the window that appears.
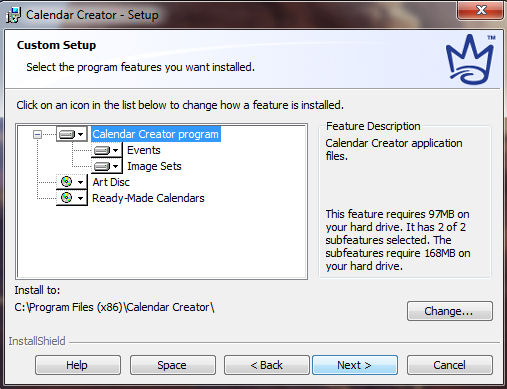
8. Select 'Modify' from the list of available options, then click 'Next'. A window similar to the one below should be displayed,

9. For any option which has a round CD image in front of that option, click on the down arrow next to that option, then select "This feature, and all its subfeatures, will be installed on the local hard drive." This will cause the round CD image to be changed to a rectangular hard drive image.
10. Repeat Step 9 for each component which displays a round CD image.
11. When all of the round CD images have been replaced with rectangular hard drive images, click 'Next'.
12. Click 'Install' to continue the installation.
13. For the CD/DVD version, when prompted to insert another CD, remove the current disc from the CD-ROM drive and insert the requested CD.
14. Allow sufficient time for the drive to read the disc then click 'OK' to continue.
15. When the message appears indicating that the installation is complete, click 'Finish' to exit the installation.
16. Remove the disc then launch Calendar Creator®.
 Attachment (1) Attachment (1)
< Message edited by Brandy redux -- 7/23/2011 12:08:03 PM >
_____________________________
For More Help: Click on the FAQ link at the top of this page Then, click on the All FAQ's button on the next page To contact me by email, please send your message to pine_97@yahoo.com
|

 Printable Version


 New Messages
 No New Messages
 Hot Topic w/ New Messages
 Hot Topic w/o New Messages
 Locked w/ New Messages
 Locked w/o New Messages
 Post New Thread